Tuesday, December 13, 2011

Little apples

Als u op het patroontje klikt krijgt u de volledige afbeelding. Druk deze af op A4-formaat of vergroot/verklein naar wens. 

Sunday, December 11, 2011

Waldorf Angel

Voor deze engeltjes gebruik je lontwol. Ik gebruikte merino lontwol die bedoeld is om mee te vilten.  Verdeel ze in drie plukken. Een om de armen (1) van te maken, een  pluk waar je de vleugels (2)  mee maakt en een wat flinkere pluk om als lichaam (3) te dienen. (Hebben engelen een lichaam?)
Verder heb je garen nodig om mee af te binden en eventueel een leuk lintje voor de versiering.


Maak in beide uiteinden van het armdeel (1) een knoop. 


Maat een knoop in de pluk voor het lichaam (3). De knoop zit niet helemaal in het midden.


 Leg eerst de vleugels, dan de armen en vervolgens het lichaam bovenop elkaar. Vouw dan de pluk boven de knoop naar achteren.


Bind de pluk die je net naar achter hebt gevouwen vast door van achter naar voor en kruislings over de borst te gaan. Maak een knoopje in de achterkant.

Start on the front, pull back the part of the roving that is above the knot. Bind with yarn by going from the back to front with a cross on the 'chest'.


 Pluk de engel een beetje in model. Eventueel kun je de engel versieren met een mooi lintje, of je gebruikt gewoon een goud- of zilverdraad af te binden.

Make a nice angel shape an maybe add a ribbon if you like. You can also use gold or silver embroidery floss to bind the angel.


Wednesday, November 30, 2011

Yarn Stars


U hebt nodig
  • twee kartonnen vierkantjes van 5x5cm. Dit karton lijkt op de achterkant van een schrijfblok, maar het is ook te koop bij de papierboer.
  • 8 kopspelden
  • een vierkant stukje stof van 4x4cm
  • dubbelzijdig plakband
  • katoen in zoveel kleuren als u mooi vindt

Plak de kartonnen vierkantjes op elkaar met behulp van het dubbelzijdig plakband. Overdrijf niet, er is niemand die ze met geweld van elkaar zou willen trekken.

Plak daar het stukje stof in het midden, ook weer met dubbelzijdig plakband en duw het uiteinde van het garen er tussen, zoals te zien is op de foto.

Steek de spelden in de punten van de kartonnen ster. Als u dit met kleine kinderen doet, is dit wel even een klusjedat u over moet nemen.

Nu gaat u met de draad van speld 1 via de achterkant naar speld 4 en komt daar weer met de draad naar de voorkant.

Van speld 4 gaat u via de voorkant naar speld 2 en vouwt de draad via de achterkant naar speld 5. Uw handen snappen het eerder dan u zelf. Van 5 over de voorkant naar 3, via de achterkant naar 6. Bij 6 komt u weer via de voorkant naar 4, via de achterkant naar 7 en vervolgens voorlangs naar 5 en achterlangs weer bij 8.

Zo ziet het er aan de voorkant uit als u een keer rond bent geweest.

En zo aan de achterkant.

Nu vouwt u lekker door, totdat het moment komt dat u zin krijgt in een ander kleurtje. Dit hecht u aan met een klein knoopje, aan de achterkant.

U vouwt door tot de hoekjes mooi aansluiten.

Duw de spelden helemaal in het karton en hecht aan de achterkant met een knoopje af. Je kunt er een mooi lintje aanmaken aan de achterkant of gewoon een lusje van hetzelfde garen.

Saturday, November 26, 2011

Paper Star Lantern


1. Gebruik hiervoor een vierkant stuk papier van tenmiste 25x25 cm. En pak vast een schaar, want die heb je dadelijk nodig. Vouw  horizontaal, verticaal en diagonaal (zoals je op de foto ziet). Na elke vouw, ontvouw je wat je net gedaan hebt weer. Draai het papier om en herhaal de stappen over de vouwen die je zojuist hebt gemaakt.
Take a square piece of paper of at least 25x25cm. And grab a pair of scissors as you will need them in a few minutes. Fold and unfold horizontally, vertically and diagonally (see picture). Turn your paper around and repeat.


2. Tussen deze vouwen moet nog een vouw komen. Let op dat je daarvoor de vouwen aansluit die met een rode stip zijn gemarkeerd. Doe dit tussen alle vouwen, dus in totaal acht keer. Tussendoor ontvouw je iedere vouw. Keer het papier, herhaal de vouwen op de achterkant.

Between the folds you just made, has to come another one. Make sure you align the marked folds. Repeat between all the folds, that makes eight times.  Unfold after every fold you make. Turn your paper, repeat on the back.


3. Vouw de hoeken van het vierkant naar binnen zoals op de foto en knip ze af. Je krijgt dan een achthoek.


Fold the corners of the square as you see in the picture and cut these of. Now you have an octagon.


4. Vouw en ontvouw de rechte randen van de achthoek naar binnen langs de gemarkeerde vouwen.

Fold and unfold all sides of the octagon inside along the marked folds.


5. Zo ziet er nu uit.

This is what it should look like now.


6.  Als je scherpe vouwen hebt gemaakt, kun je al zien dat er een stukje naar achter valt te duwen. Zie pijltje.  Vouw nu overal dit stuk naar achter tot je een vliegervormige harmonica hebt.  Uitleggen is moeilijker dan doen.Uitleggen is moeilijker dan doen.

Fold the marked part backwards  and do so for all those 'triangled pieces'. You get a kiteshaped harmonica. Explaining is the hard part really. Just do it.

7. Zo dus. Links hoe het er van boven uit ziet en rechts het zijaanzicht.

Like this. On the right you see how it should look from above on the right the view from aside.


8. Vouw nu de bovenste driekhoekjes van de vlieger naar beneden.
9. Zo ziet dat er uit van boven.


10. En vouw het onderste puntje naar boven. Hiermee maak je een bodem in je lantaarntje.

And this it how you make the bottom of your lantern.


11. Maak het lantaarntje van boven voorzichtig open en dus een beetje op de bodem. Misschien is een kaarsje in een glaasje een beter plan dan een waxinelichtje.


Open your lanterns carefully en push a little so the bottom will stand firmly. A votive light, the one with the glass around, might be a good idea. 

Tuesday, May 31, 2011

Summer fling bag tutorial


 There are two versions of this bag. One with wooden handles. Decorative, but a little inconvenient to carry around, since the handles tend to lean over to the smallest point. The other one has canvas straps. I bought these lovely canvas straps at the Purl Bee, when I was in New York (lucky bastard).

What do you need?
  • patternpaper 53x38 for  (a newspaper will do)
  • 2x outer bag  A
  • 2x lining  B
  • 2x fabric for the strip  C in the middle 54x18cm (the inner width of the wooden handle plus seam allowance). Or a 106 cm on one piece...
  • 1x outer pocket  D 55x18 cm and a nice fabric F to line it with (same size), and maybe   some vlieseline E
  • 1x inner pocket  (as big as you like it)
  • wooden handles or canvas straps
  • a magnet
Draw your pattern. This is no rocket science. You take a piece of newspaper from 55x 38 cm. Fold in half and draw.You can make perfect round edges by using a plate in the corners. When you use canvas straps (which I recommend) you use the pattern up to the dotted line, the total length will be 48 cm. Unfold your pattern and then cut out the little darts by folding both sides together (a diagonal fold) and cut of a little triangle on both edges. Now place your pattern on your fabric (which you folded, so you can cut front and back at the same time) and cut it out, both bag and lining,  but don't cut out the little triangles on the corner, instead you mark them on your fabric.


Sew and press to one side.


Now sew partly together both parts of your outer bag,  along the dotted line ( right sides facing eachother). Sew both parts of  your middle strip (C) and press the seam open (unless you have a strip that's already 106 cm long). On the long side fold and press a seam and sew it on your bag. It's now just as wide as the flaps that hold your handles or straps. (See drawing below)
Sew your front pocket. If your fabric is really thin, use some vlieseline (E). Place right sides of the outer and inner fabric(D and F) together and sew along the edges. Leave a small gap on one of the long sides and turn. Be sure your pocket and your middle strip are just as wide. There's no need to close the gap. That will follow in the next step. You might want to top stitch your pocket.

Now sew your pocket on to your middle strip. Be sure to define the middle and place that on the seam of your bag. 

Let's work on the lining of the bag (don't you love the Bob Ross sound of that?). You might want to add a pocket G  inside. Here's a wonderful tutorial for a slip pocket. This is also the moment to place your magnet. Define the middle line and place it. 

Now you can sew the rest of the bag from to *. Place the little triangles opposite from each other, like this:


Now place both bags inside each other. The right sides of the fabrics must face each other. In case of fabric handles, your must include them now and leave a gap on the side to turn the bag.


Start sewing like you see in this picture and stop sewing 5 cm before you reach this point again. Turn the bag through this gap and close it by topstitching close to the edge.


Et voila, you're done. (Well, after some serious pressing. Really, you should use that iron every little step of the way. It pays off.) If you want to look intelligent, add a newspaper. (I did it to show you it's a pocket. I don't need a newspaper to look intelligent. I have glasses since a couple of weeks. And although they might give me a slighter intelligent look, they're also screaming "over forty" very hard.)
If you use the wooden handles, it's even easier. You just leave one flap open, turn the bag, close it by top stitching close to the edge (fold in the seam) and place them over your wooden handles.

Enjoy your summer fling!
------------------------------------------------------------------------------------------------------------------------

Sunday, March 6, 2011

Magic Book Tutorial


  • 0.4 m ribbon
  • 4x cardboard 10x15 cm (you can choose your own measures)
  • 2x fabric A 13x18 cm (just make sure you have an 1.5 cm allowance)
  • 2x fabric B 13x18 cm
  • glue. I used spray glue, but this isn't necessary. You might even consider using doublesided tape...

1. Add glue to all four sides of your cardboard
2. Place the cardboard with the glued side up on the wrong side of the fabric.
3. Fold the fabric over and stick it to the glue
4. Fold the edges in a little triangle, like you are wrapping a present, before you fold the next side over.

Cover two pieces of cardboard with fabric A and the other two with fabric B.

5.Put some glue on the end of the ribbon and stick it to the cardboard, 2 cm from the top and bottom (you     can  choose 3 cm as well,  as long as it is the same on both top and bottom) If you turn the cardboard you flip the ribbon over to the right side...
6.Do the same for the crossed side. Be sure the cross is on the right side of the cardboard. I placed the cross 4 cm from both top and bottom. If you turn it over, you'll see the cross on the right side.
7. Make sure the cross is on the right side, and then glue the ribbon ends on the wrong side of your fabric B piece of cardboard. Again on 4 cm from both top and bottom.
8. Put some glue to the cardboard of your fabric B and place the other side with straight ribbons on top. Pull the ribbon thight and glue it to the backside of you crossed piece, again on 2 cm from the top and the bottom. Turn the whole thing over and glue the left piece of cardboard, covered with fabric B on top, with the right side up. Now you're done. I forgot take a picture of this step, but this shouldn't be hard to figure out. 

Now you're ready to impress your (grand)children. Isn't that what we want to do all the time?

Friday, February 11, 2011

Fabric covered notebook Tutorial


Start with your fabric A, fold it double and iron your H630 in between. It sticks on both sides.


Sew close to the fold on both pieces of fabric


Just like that.


 Sew both pieces B on the sides of piece C. If you want to enclose your label, do it now. Iron your seam open.


Sew along both sides of the seam.


Iron the normal vlieseline on the back of joined pieces B and C.


Place piece B/C with the right side up. Sew your ribbon on the side that will be on the back of your notebook. Be sure to stay within in reach of the seam allowance.  Then place both pieces A with the seam on the inside on top op piece B/C.

Place piece I, your lining fabric, with the wrong side up on the rest of your fabric. Sew 0.5 cm from the edge and leave a small opening on one side. (Be sure to do it way more neat than the line I draw with my mouse) Pull the inside out and ladder stitch the opening. (This is another piece of fabric than I used in the end. I forgot to take a picture of that one...)

That's what it looks like when you've turned it inside out.
Sew your button on et voila!

Tuesday, January 25, 2011

Origami Valentine Garland Tutorial


Various origami sheets. I cut mine in pieces of 7,5x7,5 cm. The average origami sheets measures 15x15 cm.
Fold the over the diagonal on both sides and unfold again. (Diagram below step 1)

Then you fold along the diagonal you did before. If you do it on both sides, you get a ´kite´ shape. Unfold again.(Diagram step 2)
Do the same on the other side. Keep unfolding. You ony see the lines the folds have made. (Diagram step 2)
Fold over to the `crossroad of folds´ you did before. (Diagram step 3)
This is the tricky part. You fold alongside both ´kite´ lines. Meanwhile you fold the litte triangle you made in the step before in half and lift it. It sounds harder than it is. Because of the fold you make, it will kind of go that way automatically. (Diagram step 4 and 5)
Turn the sheet around! Now fold the pointy edges to the middle. (Diagram step 6)

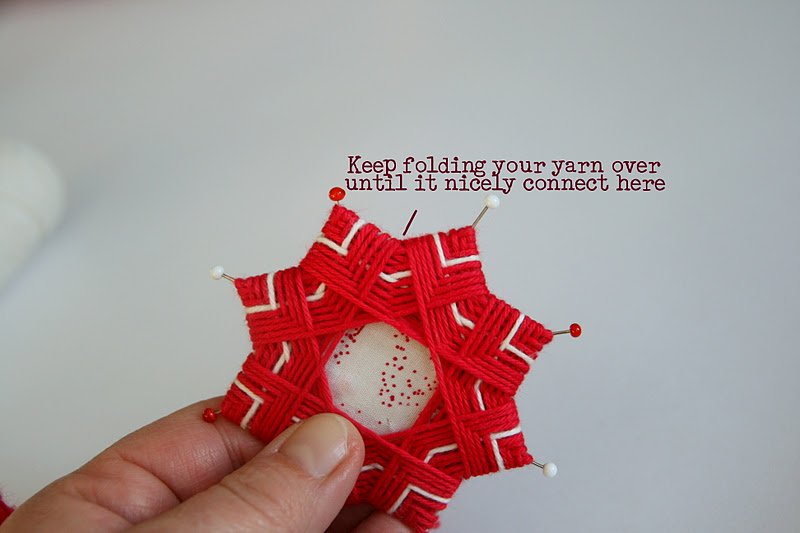
And fold the edges as you can see on the right side of my finger on the picture above to the middle. Do the same on the left side. (Diagram step 7)
Flipover and your origami Valentine´s heart is done!
Now grab some yarn, a needle with an eye big enough for your thread, and small enough for the beads you might want to use.
And that's how you put the needle through. If you use beads, tie them by backstitching every time you put one.